About Me

My photo
Hi, My name is Kate and this blog is all about my adventures of happy living. By that I mean crochet, chickens and cooking. Here's to the good life - and being a good wife! xxx
Showing posts with label sewing. Show all posts

Sunday, 13 January 2013

Business Cards

Hellooooo :)

Just a brief post before I embark on a super creative day with my lovely friend Jill.

This week I had some more exciting post (in addition to the stuff I told you about in this post yesterday). I received my business cards.

I am so proud of the tiny bits of cards. Despite the fact I am not going into business or anything, its just that sometimes I find I really could do with one. Sometimes I get asked to make bits a bobs by friends and family. Or I get chatting about blogging and need something with the link on. I also need something to write prices on when I do craft fairs.

So ........ here they are ...........


Simple, but informative. I didn't spend a lot - just £2.50 for 250 so for the cost I am quite pleased with them. I also splurged on a stamp .... which I have to keep stopping myself from stamping every where .... it is really cool.


Yesterday I got to use them.

After my aunt visited from Christmas and saw my little table runner she asked me to make one for her. So I used it as an opportunity over the Christmas break to start learning some new quilting skills.

I really enjoyed making the table runner and due to immense concentration and excitement I didn't really photograph all the way through. I just quickly took a couple of snaps once finished.


Reds and greens, with lots of lines, in the ditch quilting and some fun little reindeer's (a red sequin for Rudolf's nose or course).


And here is my first proper commissioned sewing  piece .... all bagged up with a business card. I felt like a true professional crafter!


It feels very fitting that after blogging about quilting for family that I point you in this direction ... a beautiful post by a beautiful blogger.  Lazy Daisy talks about how she restores a quilted cushion her Grandma made. You won't be disappointed!

Kate x


Monday, 31 December 2012

100th Post - last one of 2012 - what a year!!!

Today is the last day of the year when I found my love for crafting. And coincidentally it is the 100th post of the this little blog which I have enjoyed soooo much.

I thought it would therefore be best spending my 100th post, and the last one of the year, reminiscing on the journey I have made by celebrating all the ta-dah moments over the past year!

I first posted in May not really knowing where things were going to take me but I had discovered blogs like Attic24 as I was first learning to crochet and thought "I could do that". And I am so glad I did. Blogging has introduced me to a whole community ... not just online but also in my town.

Although I was very very ropey both in blogging and crocheting I made my first blanket. For a baby, which sadly never came ... but without my new found hobbies I don't think I would have ever got through it. This blanket is now safely in a box with a few other little memories.

 
I then picked up the hook and yarn bug ever so quickly ....... I literally went mad for it!!! I made some birthday bunting, which now traditionally gets hung up on all of the families birthdays, some olympic bunting which me and my sister waved like crazy when we went to London 2012 (and is still strung in my car's back window).


These quicker projects gave me much needed breaks while I tried to complete my brightly coloured vertical strip blanket. This is now a much loved beach/picnic/chair cover blanket! A new family heirloom.

 I must take a second out from the yarn ta-dah's and just salute the Queens Jubilee (wasn't it fantastic!!!!) with my little Patriotic Felty Birds which still hang with British pride in my kitchen and get the most attention from visitors!


While completing my first projects I also learnt how to knit. I didn't really pick it up as quickly or with as much enthusiasm as crocheting, but I did stick with it and I am glad I did. I started off with some easy projects and did a sample scarf with some sneaky crocheted flowers to hide the mistakes. My granny wore it every day we went out over the Christmas holidays and I am glad to say it looks alright!


In my knitting class everybody made a doll to send to Africa, which I embraced and learnt a whole lot whilst making it. I definitely want to do some more charity knits in 2013.


I also made a little Mrs TT Mouse which my sister-in-law took to Thailand as a good luck charm during her travels.


By this time, its was all clicking and boy was I on a crafting high .... a high I don't think will really ever go! I felt confident enough to start making things for the home and learnt to Tunisian crochet some arm covers and cushions for our living room and a nice beach inspired rug to hide a stain on the carpet in our bedroom.


I started to use wool to make gifts as well .... scarfs and snoods for friends and family, baby blankets for new arrivals and decorations and felted bags and mice for Christmas gifts.


For my birthday in September my husband also brought me a sewing machine .... I was too scared to touch it for weeks but as soon as I did I caught that bug as well .... just in time for Christmas. I made some lovely little advent bags for my mum and dad and in laws (as well as myself) and filled them with some little goodies to help with the build up to Christmas. I went to a couple of amazing workshops and learnt new skills and came out with some festive stockings which are now with my godchildren in Oz and a Christmas Tree table runner ..... which has inspired my first commissioned pieces; a table runner for my Auntie. I also have made the most out of scraps with bunting and hanging tree decorations.
 

Phew ..... I think I have covered the main bits! Wow what a year! What an achievement.

Other than crafting I have had a nice year, a tough one, but a lovely one all the same. Some lovely holidays, new Friends, a weekly crafting circle to go to and our lovely chickens (in the picture is Jill .... the one that got away)! I have so much to be grateful for and would like to thank you all for taking my on the ride as well! You are all wonderful and lovely and inspiring!!!!!! Thanks!


So 2013 ....... a few goals.............
  • Keep crafting and blogging and getting better!!!
  • Try some craft fairs (I have already booked on one at the end of the month) to raise some money for materials.
  • Read 12 books (one a month). I have already decided on six.
  • Try mediation.
  • Do a charity knitting project.
  • Loose some weight.
I am sure I will keep you posted along the way!

Love and best wishes for 2013

Kate aka Granny Taught Me To Crochet.

xxxxxxxxxxxxxxxxxxxxxxxxxxxxxxxxxxxxxxxxxxxxxxxxxxxxxxxxxxxxxxxxxxxxx

Saturday, 29 December 2012

Scrappy Christmas Bunting and Scented Christmas Tree Decorations using scraps from the scraps)

I had almost forgot to post about my thrifty delight that is "scrappy Christmas bunting".

I was the most perfect-simple-oh-so-satisfying couple of hours I spent on the morning of Christmas Eve.

I had a fair bit of joined up jelly roll strips from the Christmas Table Runner (if you haven't yet seen it .... follow this link ... I hope you like it! I am uber proud!) so carefully snipped out some triangles and then some plain fabric in festive green.


I then whipped up 10 flags and then raided my "pretty little things" (whilst humming this tune) and added some cute little bells and charms that fell out of the most beautiful little Paperchase crackers I purchased in last years January Sales .... I knew they would come in use!


These little pretty things were tooooooo pretty to just tie on with any normal thread! I used my precious vintage roll of gold thread that I received from the lovely mum in a parcel she sent me during the Bloggy Blanket Chain (if you go and check out this post I did about it then you can follow the link to Mum's page .... she is so brilliant and does do a great job of looking after all of us bloggers!).

Anyways ..... what more fun could I be having ..... creating-Christmas-crafts!!!!


After using some lovely left over spotty red bias binding to join all the flags up I decided the wall in our kitchen could do with a little bit of jollying up .... so two tacks later (and a little help from Craig) our kitchen wall looked like it was celebrating Christmas too!


Ta-Dah!!!!!

And if that wasn't enough fun for the morning!!! ..... There were scraps left from the scraps!!!

So I made lots of little triangles and made some Christmas Tree Scented Tree Decorations!

Oh so easy, oh so smelly, oh so lovely!

Firstly I got a bowl and put in Christmas smelling stuff ..... Cinnamon sticks, orange peels, mixed spice, cloves ..... etc .... your all Christmas loving peeps ..... you know the whiffs!


I mixed it together and took a sniff .... but being careful not to sniff too hard .... I didn't want to Christmas over-dose!

I then filled my little tree's with toy stuffing and and teaspoon of the smelly-stuff and then joined up the gap with a tree trunk!


These were used to wrap up little gift bags of homemade fudge to give to my guests coming in the afternoon for coffee and mince pies .... and they went down a treat!


So that was my little morning of sewing ..... ahhhhh .... it seems like so long ago ... I wish it was Christmas Eve again, everything is over so quickly when you grow up .... I guess it won't seem like a minute until the next one arrives though!

Thanks for stopping by.

Love xxxxxxxxxxx

**********************************************************************************
A Tutorial on how to make bunting.

Cut long strips from various fabrics. Either all the same width (including your seam allowance) or at variant angles and widths (this is easier when your a beginner).

Join the strips by placing two pieces the right side together and sewing a hem along the long edge. Keep adding a strip until you have the correct width. Then press the seams.

Next use a template and cut out all of your flags (plus one triangle for the back - I used plain green fabric) from the new piece of stripey fabric you have just made.

Then, place your front piece and back pieces together, the right sides facing in. Go around each of the triangles on your sewing machine, leaving the straight, top edge free.

Turn all of your flags out the right way and iron them. I then trimmed the top edge as this was a little wonky now.

Arrange onto your bias binding (there are some great videos on you tube if you want to know how to use it) and then zoom up the row of flags with your sewing machine.

I then added some little trinkets on the bottom. You can add buttons on the binding in between the flags as this looks nice too.

If you want to see a crochet bunting tutorial then check out this link to one of my previous posts where I made some Happy Birthday Flags!

**********************************************************************************

Friday, 21 December 2012

Christmas Tree Table Runner - TA - DAH!!!!!


Over the past few weeks I have been working on a Christmas Quilted Table Runner. Since I have started learning how to sew it has always been my aim to learn how to quilt. I saw the workshop advertised on the lovely Lichfield Sewing Shop facebook page and signed up there and then.

After going to the stocking workshop and enjoying it so much, and even coming home feeling inspired to go on and produce more and more stockings I was confident that this was the start of a beautiful quilting relationship.

So to start .... we joined 6 strips of delicious red fabric together and then six green strips of fabric.

This was my favourite bit!!!! I loved the easiness (remember I am a beginner!!!) of zooming up and connecting AmAzInGlY gOrGeOuS strip of fabric to another AmAzInGlY gOrGeOuS strip of fabric.
 
I spent that particular half an hour in sewing shop paradise! I mean who can blame me .....

Once I had pressed the seams I cut out lots of Christmas tree triangles out of my new stripy pieces of fabrics.
 
Then it was onto the slightly harder stage two where I cut out all of the white fabric joining bits. Followed by the even harder, and must concentrate, part of joining my Christmas trees with the white fabric bits.
 
And then some more pressing. Does anyone else love the smell of iron and fabric? No, just me then??
 
This took me to the end of the day and I scheduled in to come back and finish it off once I had broken up for work. Plenty of time to admire those lovely pieces of fabric and soak up all the different things I had learnt.
On Monday I returned feeling confident I would be able to complete at home (guided by the wonderfully provided instructions of course!). All I needed was to go back to the shop for a touch of the magic rotary cutter to straighten up my edges and a little fill of Sewing Shop lurveee .... a debate of Lucy's Festive Crocheted Wreath and a comparison of husband present buying mishaps.
At home, I had got the bug big time. Monday night was spent adding the trunk details and final white border.
 
And then it was onto the bit I had been waiting for....... QUILTING!!!!
My kitchen floor became my workbench and the rest of the room was transformed into hazardous amalgamation of flying pins and steaming irons as I joined the wadding and backing fabric onto my lovely Christmas tree scene!
 
Then was the fun bit ..... sewing it all together! After much debate with my better half we decided on vertical lines all over.
 
A couple of hours later, two broken needles and a few horizontal additional lines later I was the owner of a ooooo soooooo lovely (unbinded) quilt. I felt like squealing with excitement, and my husband was pretty chuffed too!
I rewarded myself with a little snowball and a nice early night!
The next morning I was all charged up ready to bind the quilt with my red spotty bias binding. I didn't want to make the usual mistake of just s"eeing what would happen without thinking about it first" ..... so I did a bit of research on youtube. I found this fantastic video which I had on pause as I went round corner by corner.
After loosing two needles to the thickness of the quilt, I made the correct decision to add a thicker needle - and it paid off ... the mitered corners were pretty hefty!
 
So, I conclude, after a journey of blood (nasty pins), sweat and tears, sheer pride and gleeful joy!
Drum roll please ....... drdrdrdrdrdrdrdrdrdrdrdr........
 
TA-DAH!!!!!!!!!!!!!!!!!!!!!!!!!!!!!!!!!!!!!!!!!!!!!!!!!!!!!!!!!!!!!!!!!!!!
 
My proudest blogging ta-dah to date.
A scrummy quilted table runner. Not bad for a first go, huh?
Don't you just love the fabrics??? I think my favourites are the nordic red and white strip, the spotty green one and the holly piece. Luscious!
 
One last look and then I will have to go ...
 
Ahhhh, a lovely satisfied foot photo! I will now find a lovely place to put it. Hearth? Coffee Table? or Dining Table? I am sure it will travel with me to a fair few places over the next week or two.
Thanks for reading, and all of your continued lovely comments and I'll speak soon xxxxxx
Kate xx


Saturday, 27 October 2012

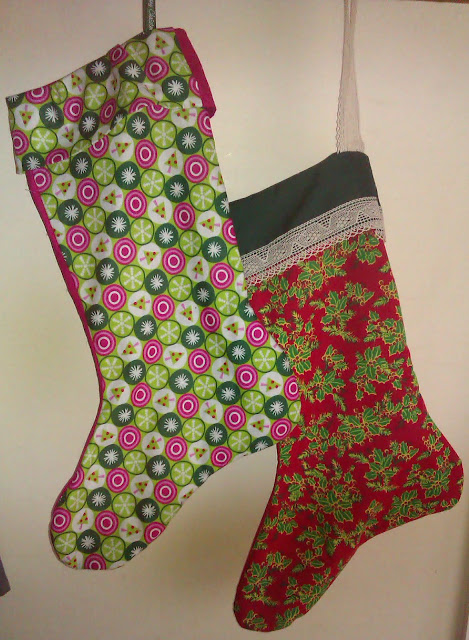
Christmas Stockings

Today has gone just as planned. A lazy morning, a lovely fry up (yummy) and a good session on my sewing machine.
 
My plan for a homemade Christmas is going well, I must admit. I have found refuge in lots of hooky time and really enjoyed writing out a list of what I will make for each person I am sending a gift to. And guess what, I am on schedule!
 
Today was a great opportunity to sit down and try and recall the Stocking Workshop I attended over two weeks ago. Lindsey and Sandra must have done a good job because I had no problem!
 
I cut out all of the components and stitched them together. Oh I do love my sewing machine, it works like an absolute dream! I love hearing it chugging along keeping me company while I make!


I even remembered to snip into the curves!!

 
And they are hanging (only for a few minutes for my to enjoy though ... far to early for festive decorations!!)


I loved using this lacy trim to add a little vintage cheer. Doesn't it look like rolling snowy hills and Christmas trees. I would love to be somewhere like that now. All wrapped in lovely woolly warmers! Ahhhhhh!


This is the reverse of the third stocking. I actually think it looks really nice. Simply red, white and green. :)
 
 
Lovely ribbon, salvaged of a pyjama packet! Isn't it funny how when you start crafting, everything can be put to use!

 
I am starting to use my Facebook Page a lot more (do please pop over and say hi) as I am not getting as much time to write full blogs at the moment. So its great to just do a quick update and have a chat!
 
Finally, pop over to my Snowflake Swap post and put your name down! Go on ... it'll be fun!!!
 
Kate xxxxxxxxxxxxxxxxxxxxxxx
 

Wednesday, 10 October 2012

Stocking Making Workshop

Hey!

Wow what a busy day.

This morning I got a good sew-on and completed 20 little bags.


Don't you just love this reindeer fabric I picked up from a little haberdashery shop in Wales!?


I have just got back from a lovely workshop on making stockings. It was held by the lovely Lindsay and Sandra at The Sewing Shop in Lichfield. Check out their facebook page for loads of inspirational pictures and crafty chat.

When I arrived I was greeted with a lovely hot mug of tea and got to choose two types of fabrics. The choices were endless with lots of traditional holly's, warm reds and lush greens. I thought I would go for something bright though seen as I already was doing my advent bags in traditional fabrics. So I chose this gorgeous contemporary bright green and pink fabric with little snowflakes and cute Christmas trees on. Isn't it beautiful!


As I was a little late (my mistake ... and I thought I was super early!) I got a little bit mixed up with the lining and the outside but Lindsay was so good at explaining and together we overcame the challenge of working which piece of fabric needed to go on the outside and which fabric needed to be on the inside.

We then had a gorgeous mince pie. The first of the year, which we all decided deserved a wish. But I won't tell you what mine was, now that would be telling!


Then it was onto the sewing machines to put the stocking together. My favourite bit!


It was the most challenging part of the workshop was then putting the edging on, along with the ribbon and having lots of ends to catch into the hem. The last job is always the most nerve racking though because so much work has gone into the project. But we all were so pleased when we turned our stockings out and revealed a lovely piece of work.


I then had free reign of the shop and spent a good 30 minutes discussing ideas with the ladies and deciding which fabrics to take home for stocking #2. I chose some lovely autumnal colours to match our living room. I'm sure whatever is left over will make a lovely patchwork cushion.

I was really spoilt for choice but eventually decided on five contrasting fabrics and had some fat quarters cut fresh off the bolt!


I also went with a shopping list so I could finish off the advent project and came back with some lovely ribbons, threads and buttons.


I also couldn't resist half a meter of this reindeer ribbon and the best bargain of the day ... 3m of pretty lace for £1!!!


So I feel inspired and ready to get making on my 2nd day of craft. Yippee!!!

Oh, I almost forgot, fancy a look at the finished product?

Here we go ....


Looking slightly premature there on the bar walls usually covered in cards and decorations ... but doesn't it look great!

Before I go I must let you all know I have just set up a Granny Taught Me To Crochet group on Facebook. I hope you get a chance to pop by and say hello!

Kate xxxx